-
아두이노 라이브러리 | 로드셀 신호 증폭 모듈 HX711Technology/Arduino 2026. 1. 9. 18:00반응형
1. 스트레인 게이지
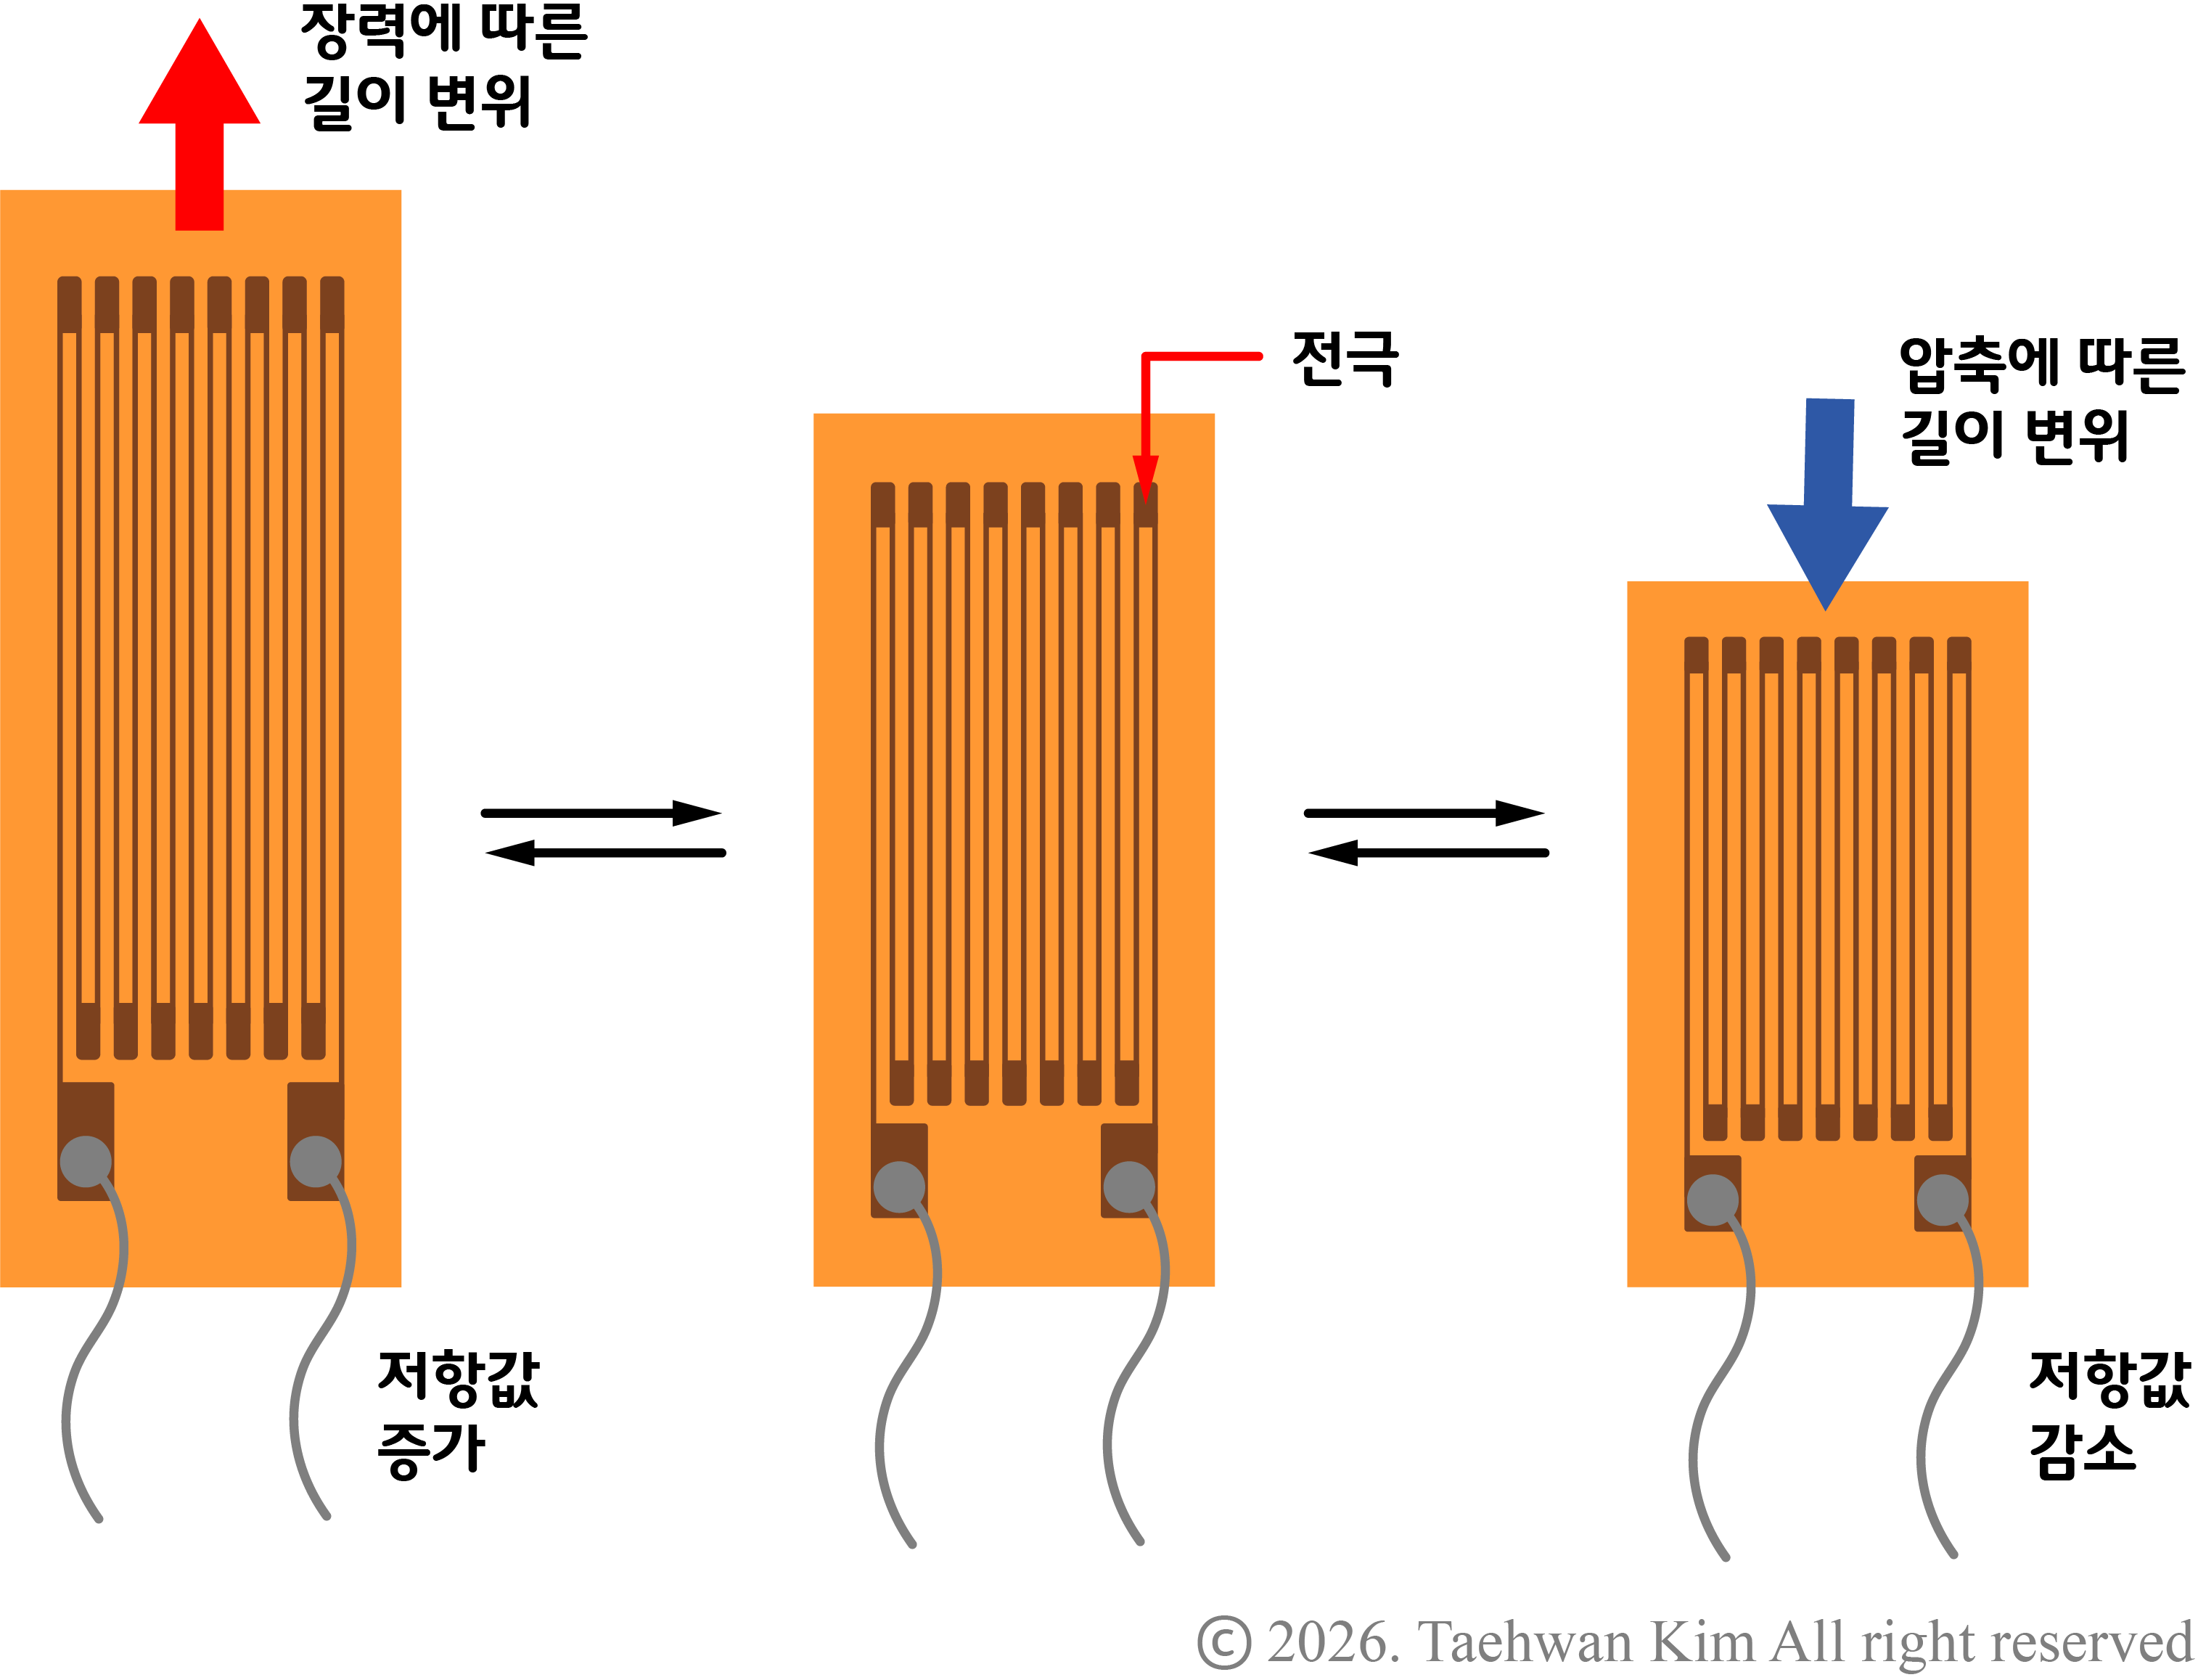
스트레인 게이지 모든 물체는 힘을 받으면 눈에 보이지 않더라도 길이가 늘어나거나 줄어든다. 만약 힘을 받는 물체가 전류가 흐를 수 있는 금속이라면 힘에 의해 발생하는 미세한 길이 변위(strain)에 따라서 금속의 전기 저항이 변한다. 스트레인 게이지(strain gauge)는 해당 원리를 이용하여 길이 변위를 전기적 신호로 바꿔주는 센서이다. 스트레인 게이지 내에서 금속에 해당하는 전극을 구불구불하게 배치하여 길이 변위에 따른 전기 저항 변화를 증폭한다. 스트레인 게이지를 단일로 사용하기보다는 구조물에 접착제로 부착한 뒤 구조물의 길이 변위를 측정하는 방식으로 사용한다.
2. 로드셀
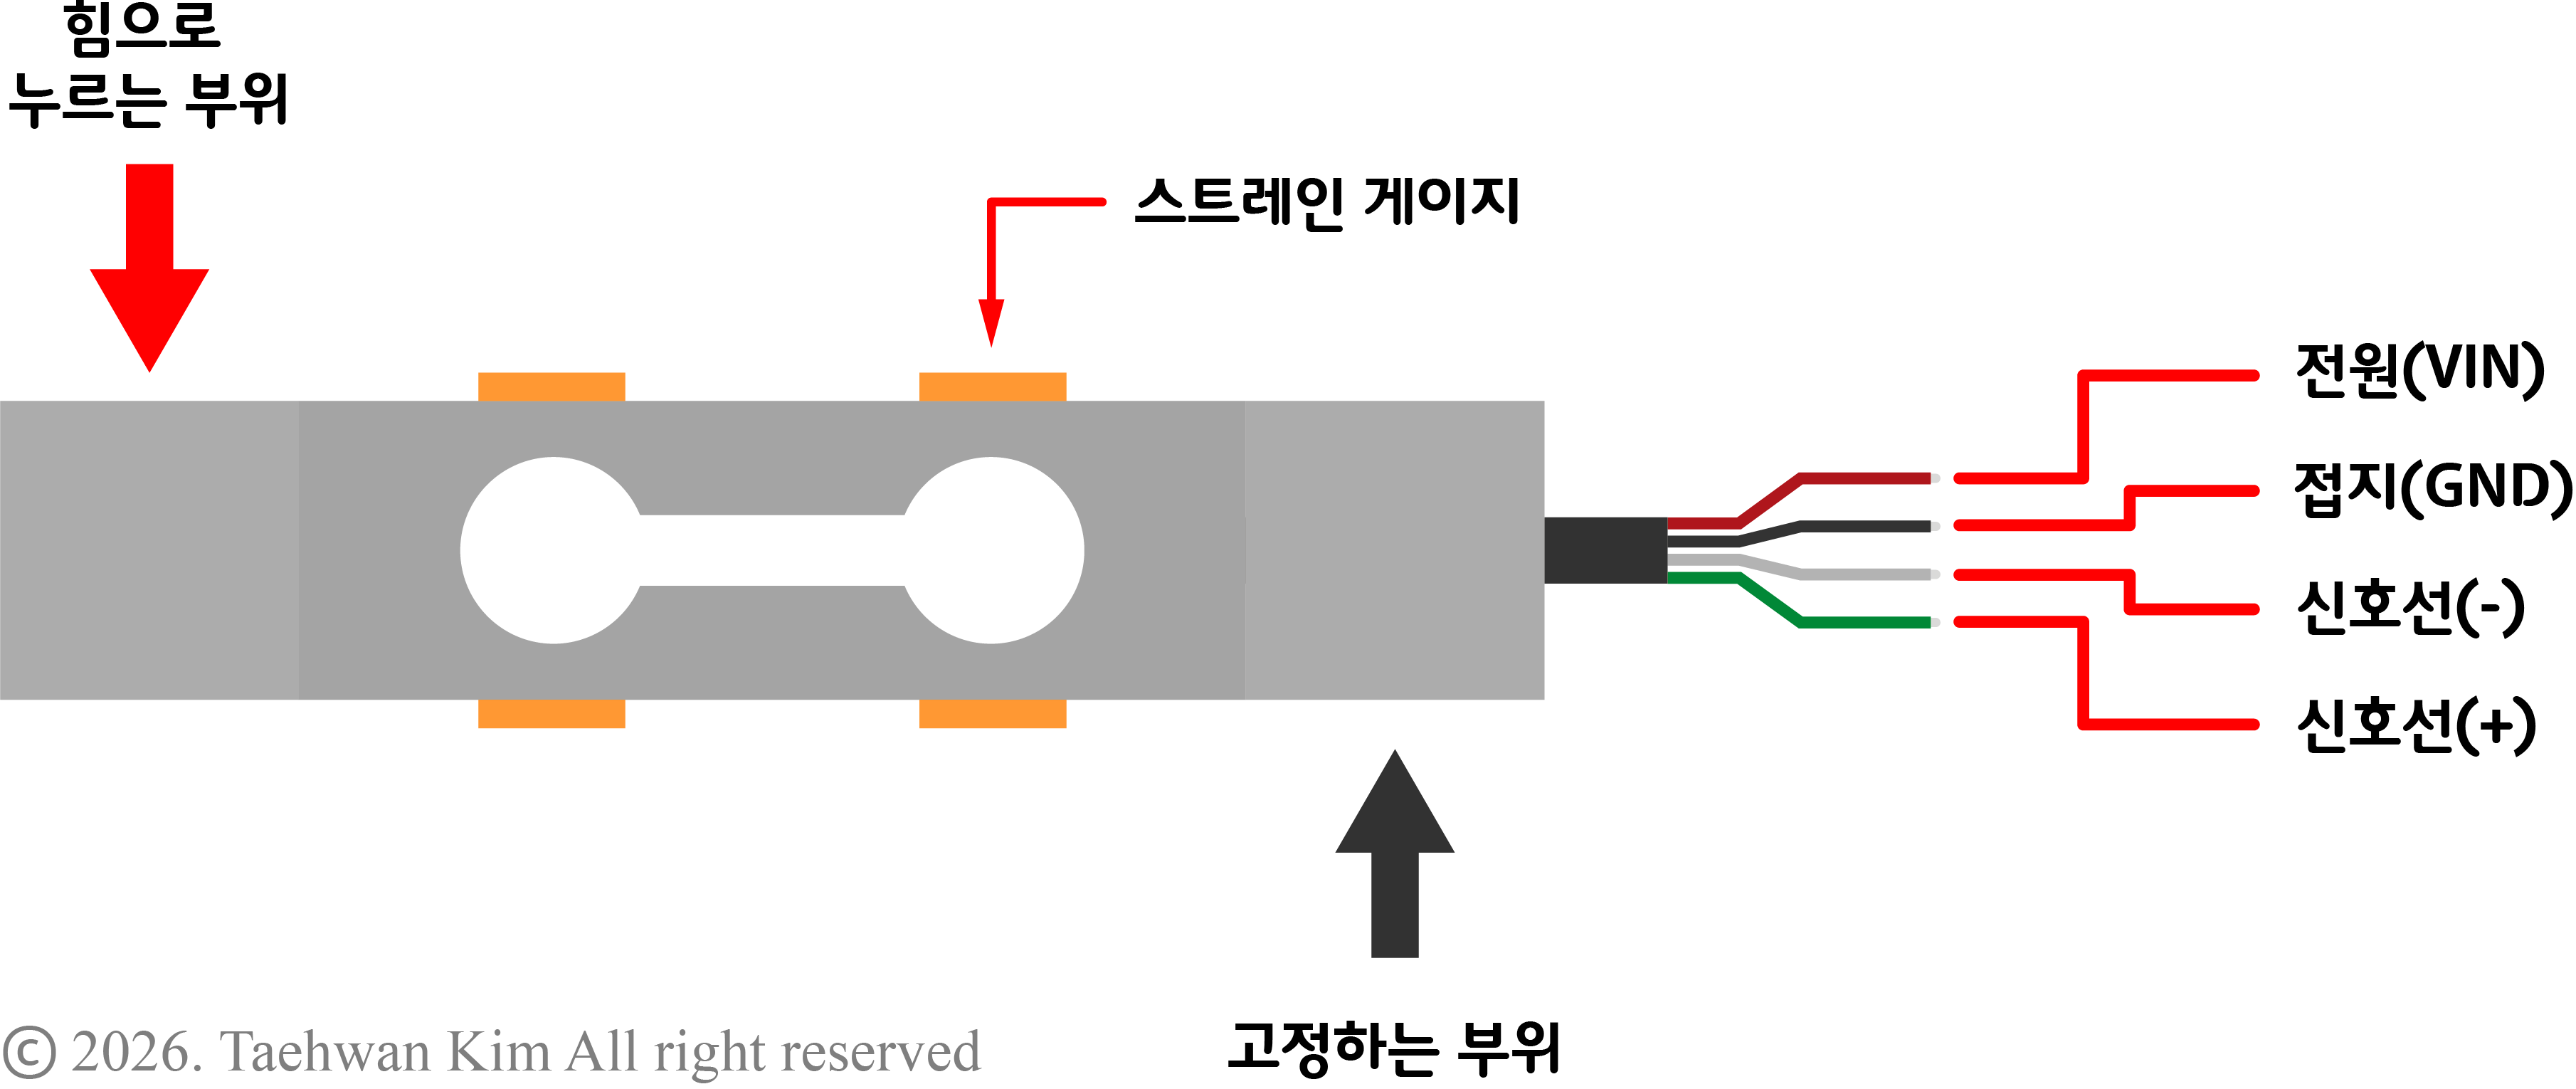
로드셀 구조물에 힘이 가해지면 그에 따라 변형이 발생한다. 이때 구조물에서 특정 부위의 길이 변위를 알면 이를 구조물에 가해진 힘과 일대일로 연결하여 간접적으로 힘을 추정할 수 있다. 이와 같은 방식으로 힘을 측정하기 위해 스트레인 게이지를 부착하여 만든 구조물을 로드셀(load cell)이라고 부른다. 일반적으로 길이 변위와 힘의 선형성을 보장하기 위해 금속 구조물을 사용하며, 길이 변화에 따른 신호를 증폭하고 온도 변화에 따른 외란을 방지하기 위해 네 개의 스트레인 게이지를 표준 위치에 부착하여 풀 브리지(full bridge) 회로를 형성한다. 구조물의 크기와 형상에 따라 선형성을 보장하는 최대 측정용량이 다르기 때문에 본인의 사용처에 맞는 용량을 골라야 한다. 해당 예제에서 다루고자 하는 로드셀은 최대 측정용량 500g으로, 아래 링크로 접속하면 구매할 수 있다.
로드셀 (Load Cell) 500g - 4선식 Full Bridge, 500g Al Beam Load Cell
Full-Bridge 측정 방식 / 최대 측정범위 : 500g / 최대 허용범위 : 750g / 인가전압 : Max 8V
www.devicemart.co.kr
3. 로드셀 신호 증폭 모듈 HX711
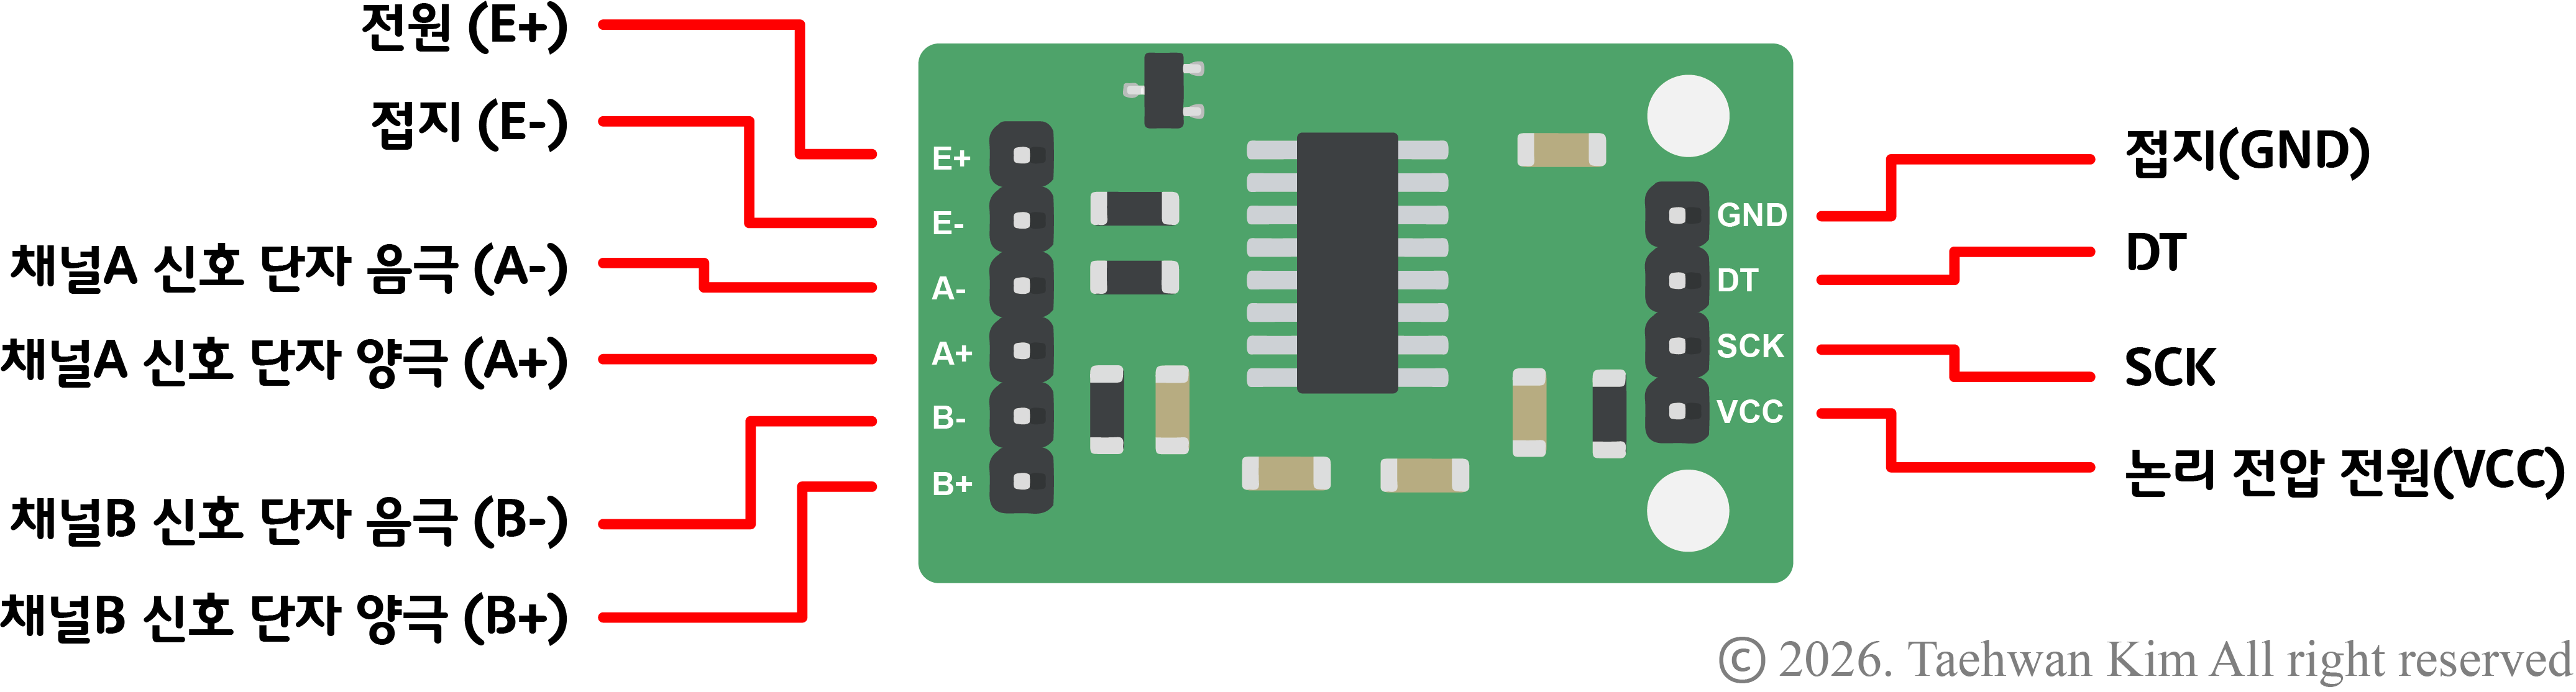
로드셀 신호 증폭 모듈 HX711 스트레인 게이지에서 발생하는 길이 변화는 보통 우리 눈에 보이지 않을 만큼 미세하기 때문에, 이에 따른 신호 변화 또한 마이크로컨트롤러가 인식하기에 아주 미세하다. 따라서 미세한 신호를 마이크로컨트롤러가 인식할 수 있을 정도로 증폭하기 위한 추가 회로가 필요하다. 로드셀 신호 증폭 모듈 HX711은 로드셀에 부착된 스트레인 게이지의 신호를 증폭하여 출력하는 기능을 지원한다. 또한 스트레인 게이지로부터의 아날로그 신호를 24비트 해상도의 디지털 신호로 변환하여 I2C 통신으로 출력하므로, 마이크로컨트롤러가 지원하는 ADC보다 더 높은 해상도로 신호를 받아볼 수 있다. 한 모듈로 최대 두 개의 로드셀 신호를 받을 수 있으며, 아래 링크로 접속하면 해당 모듈을 구매할 수 있다.
HX711 로드셀 측정 24비트 AD 컨버터 모듈 [SZH-SSBH-016]
24비트의 높은 분해능 / ADC 컨버터 내장형 HX711 칩셋 기반 / Voltage: 2.7V - 5V / Size:35mm x 22mm
www.devicemart.co.kr
4. 아두이노 라이브러리 추가
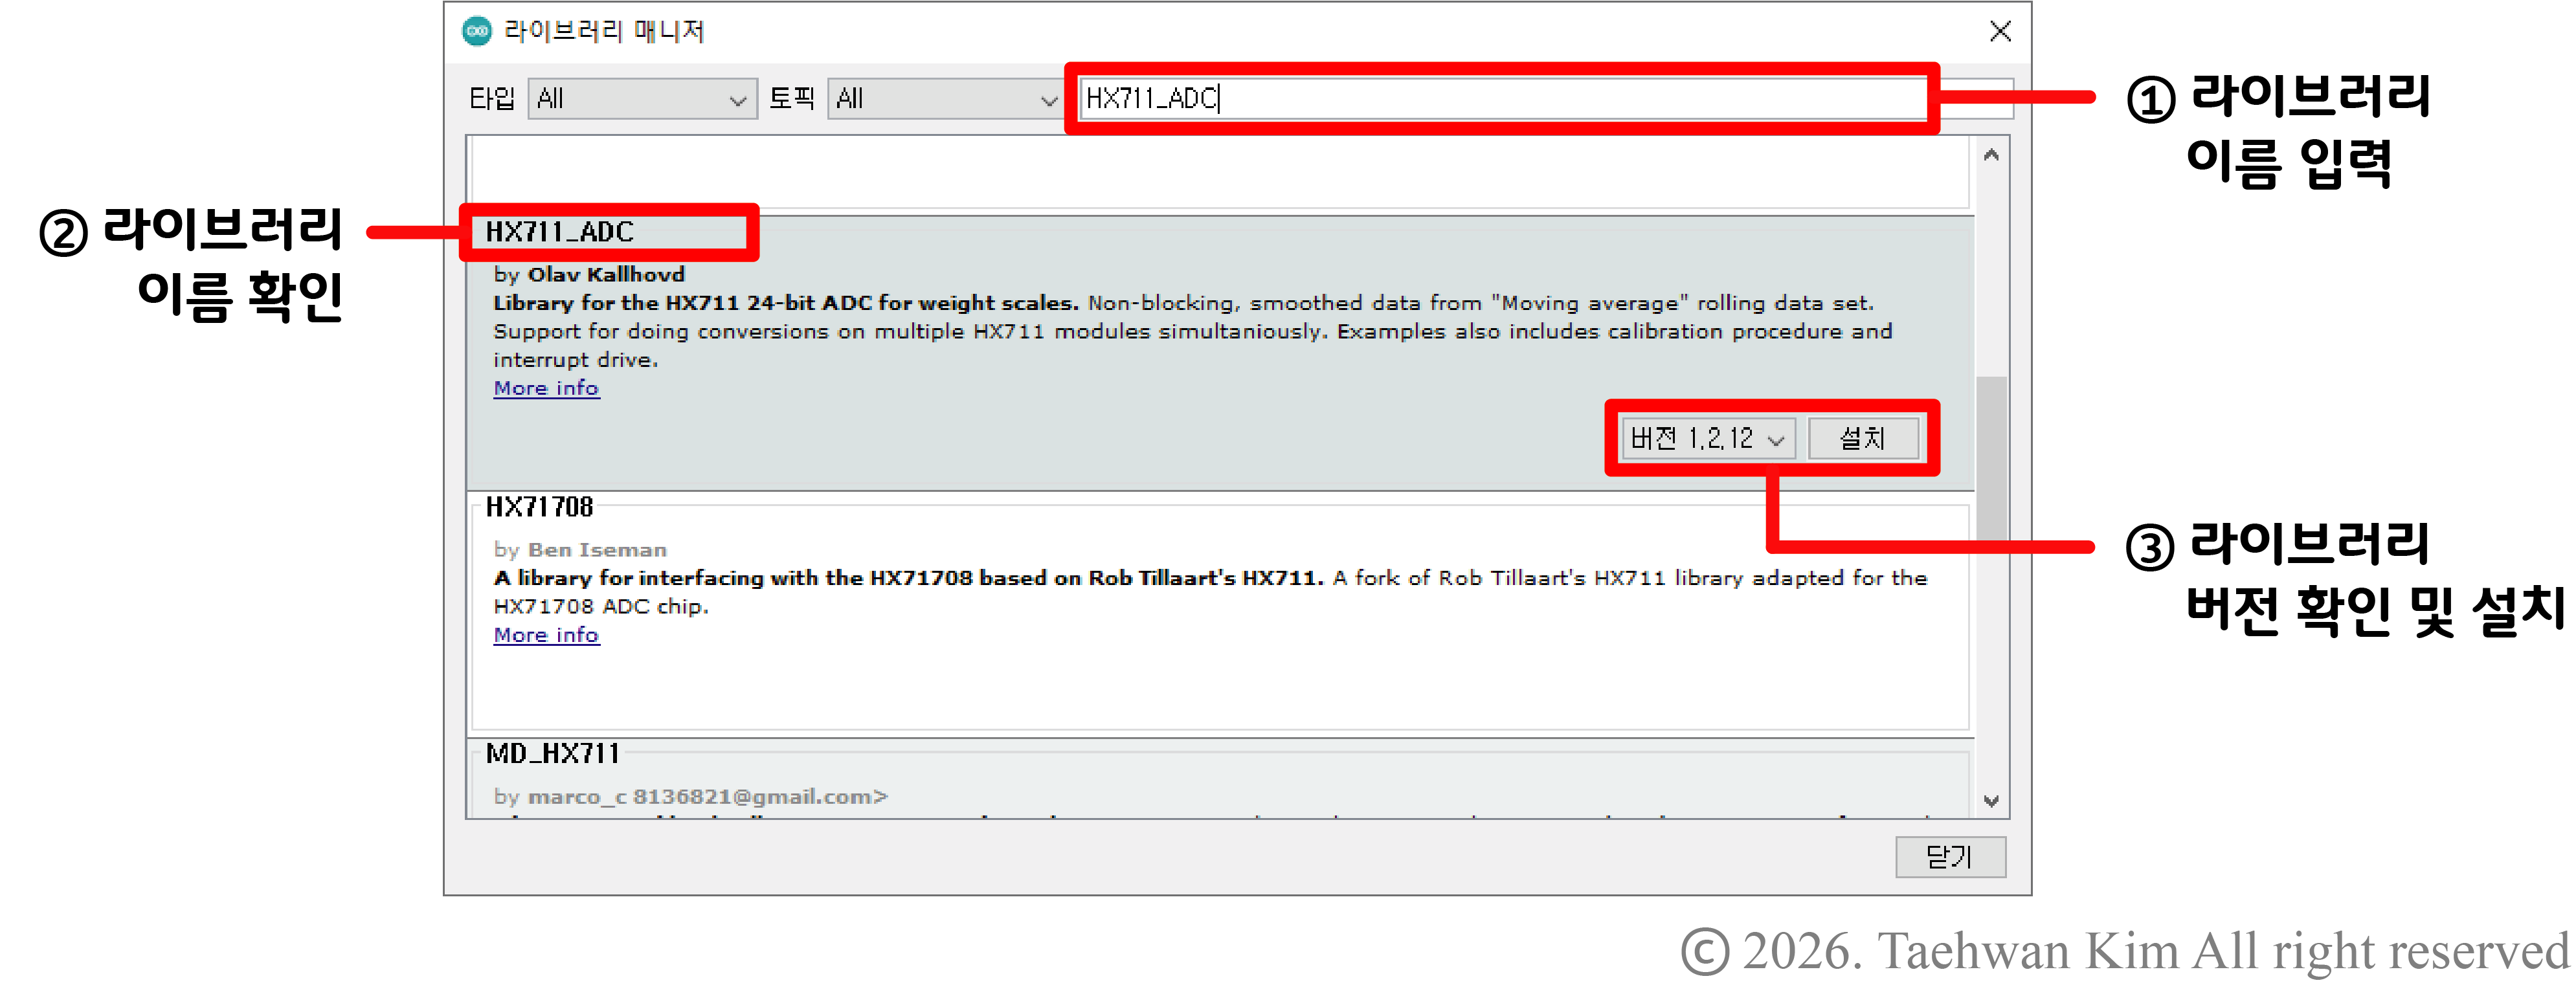
아두이노 라이브러리 추가 아두이노 플랫폼에는 HX711 모듈과 통신하기 위한 알고리즘이 라이브러리로 구현되어 있다. 그러나 기본적으로 제공되는 라이브러리는 아니기 때문에 라이브러리를 IDE에 추가하는 과정이 필요하다. 아두이노 IDE 상단 툴바에서 '툴'을 선택한 뒤 '라이브러리 관리' 항목을 선택하자. 그러면 곧이어 '라이브러리 매니저' 창이 나타나는데, 해당 창 오른쪽 상단에 라이브러리 이름을 입력하면 아두이노 플랫폼에서 지원하는 라이브러리를 검색할 수 있다. 해당 칸에 'HX711_ADC'를 입력하자. 라이브러리를 검색하면 입력한 검색어와 관련된 라이브러리 목록이 나타나는데, 이중에서 'HX711_ADC' 라이브러리 최신 버전을 선택하여 설치하도록 하자. 아래 링크로 접속하면 해당 라이브러리에 대한 설명과 사용방법을 확인할 수 있다.
GitHub - olkal/HX711_ADC: Arduino library for the HX711 24-bit ADC for weight scales
Arduino library for the HX711 24-bit ADC for weight scales - olkal/HX711_ADC
github.com
5. 로드셀 캘리브레이션

로드셀 캘리브레이션 로드셀을 사용하기에 앞서, 로드셀에 가해진 힘과 스트레인 게이지로부터 출력되는 전압 신호의 관계를 파악하는 캘리브레이션(calibration) 과정이 필요하다. 먼저 로드셀 고정 부위를 움직이지 않는 바닥에 고정하고, 로드셀 하중 부위에 구조물을 설치한다. 이때 스트레인 게이지가 부착된 로드셀 중앙 부위가 바닥에 닿거나 다른 물체와 접촉하지 않도록, 위 그림처럼 고정 부위와 하중 부위에 높이 단차를 만들어야 한다. 캘리브레이션을 위해 첫 번째로, ① 로드셀 하중 부위에 아무런 무게를 올리지 않고 로드셀 신호값을 측정한다. 그 다음, ② 로드셀 하중 부위에 무게를 이미 알고 있는 물체를 올려놓고 로드셀 신호값을 측정한다. 마지막으로 ③ 두 신호값을 선형 보간하여 하중에 따른 신호 모델을 획득하는 것으로 캘리브레이션을 마친다. 앞서 설치한 HX711_ADC 라이브러리는 캘리브레이션을 위한 알고리즘 또한 지원하고 있으므로 아래 예제를 실행하여 시리얼 모니터의 안내를 따르도록 하자.
6. 예제
6.1. 회로 구성
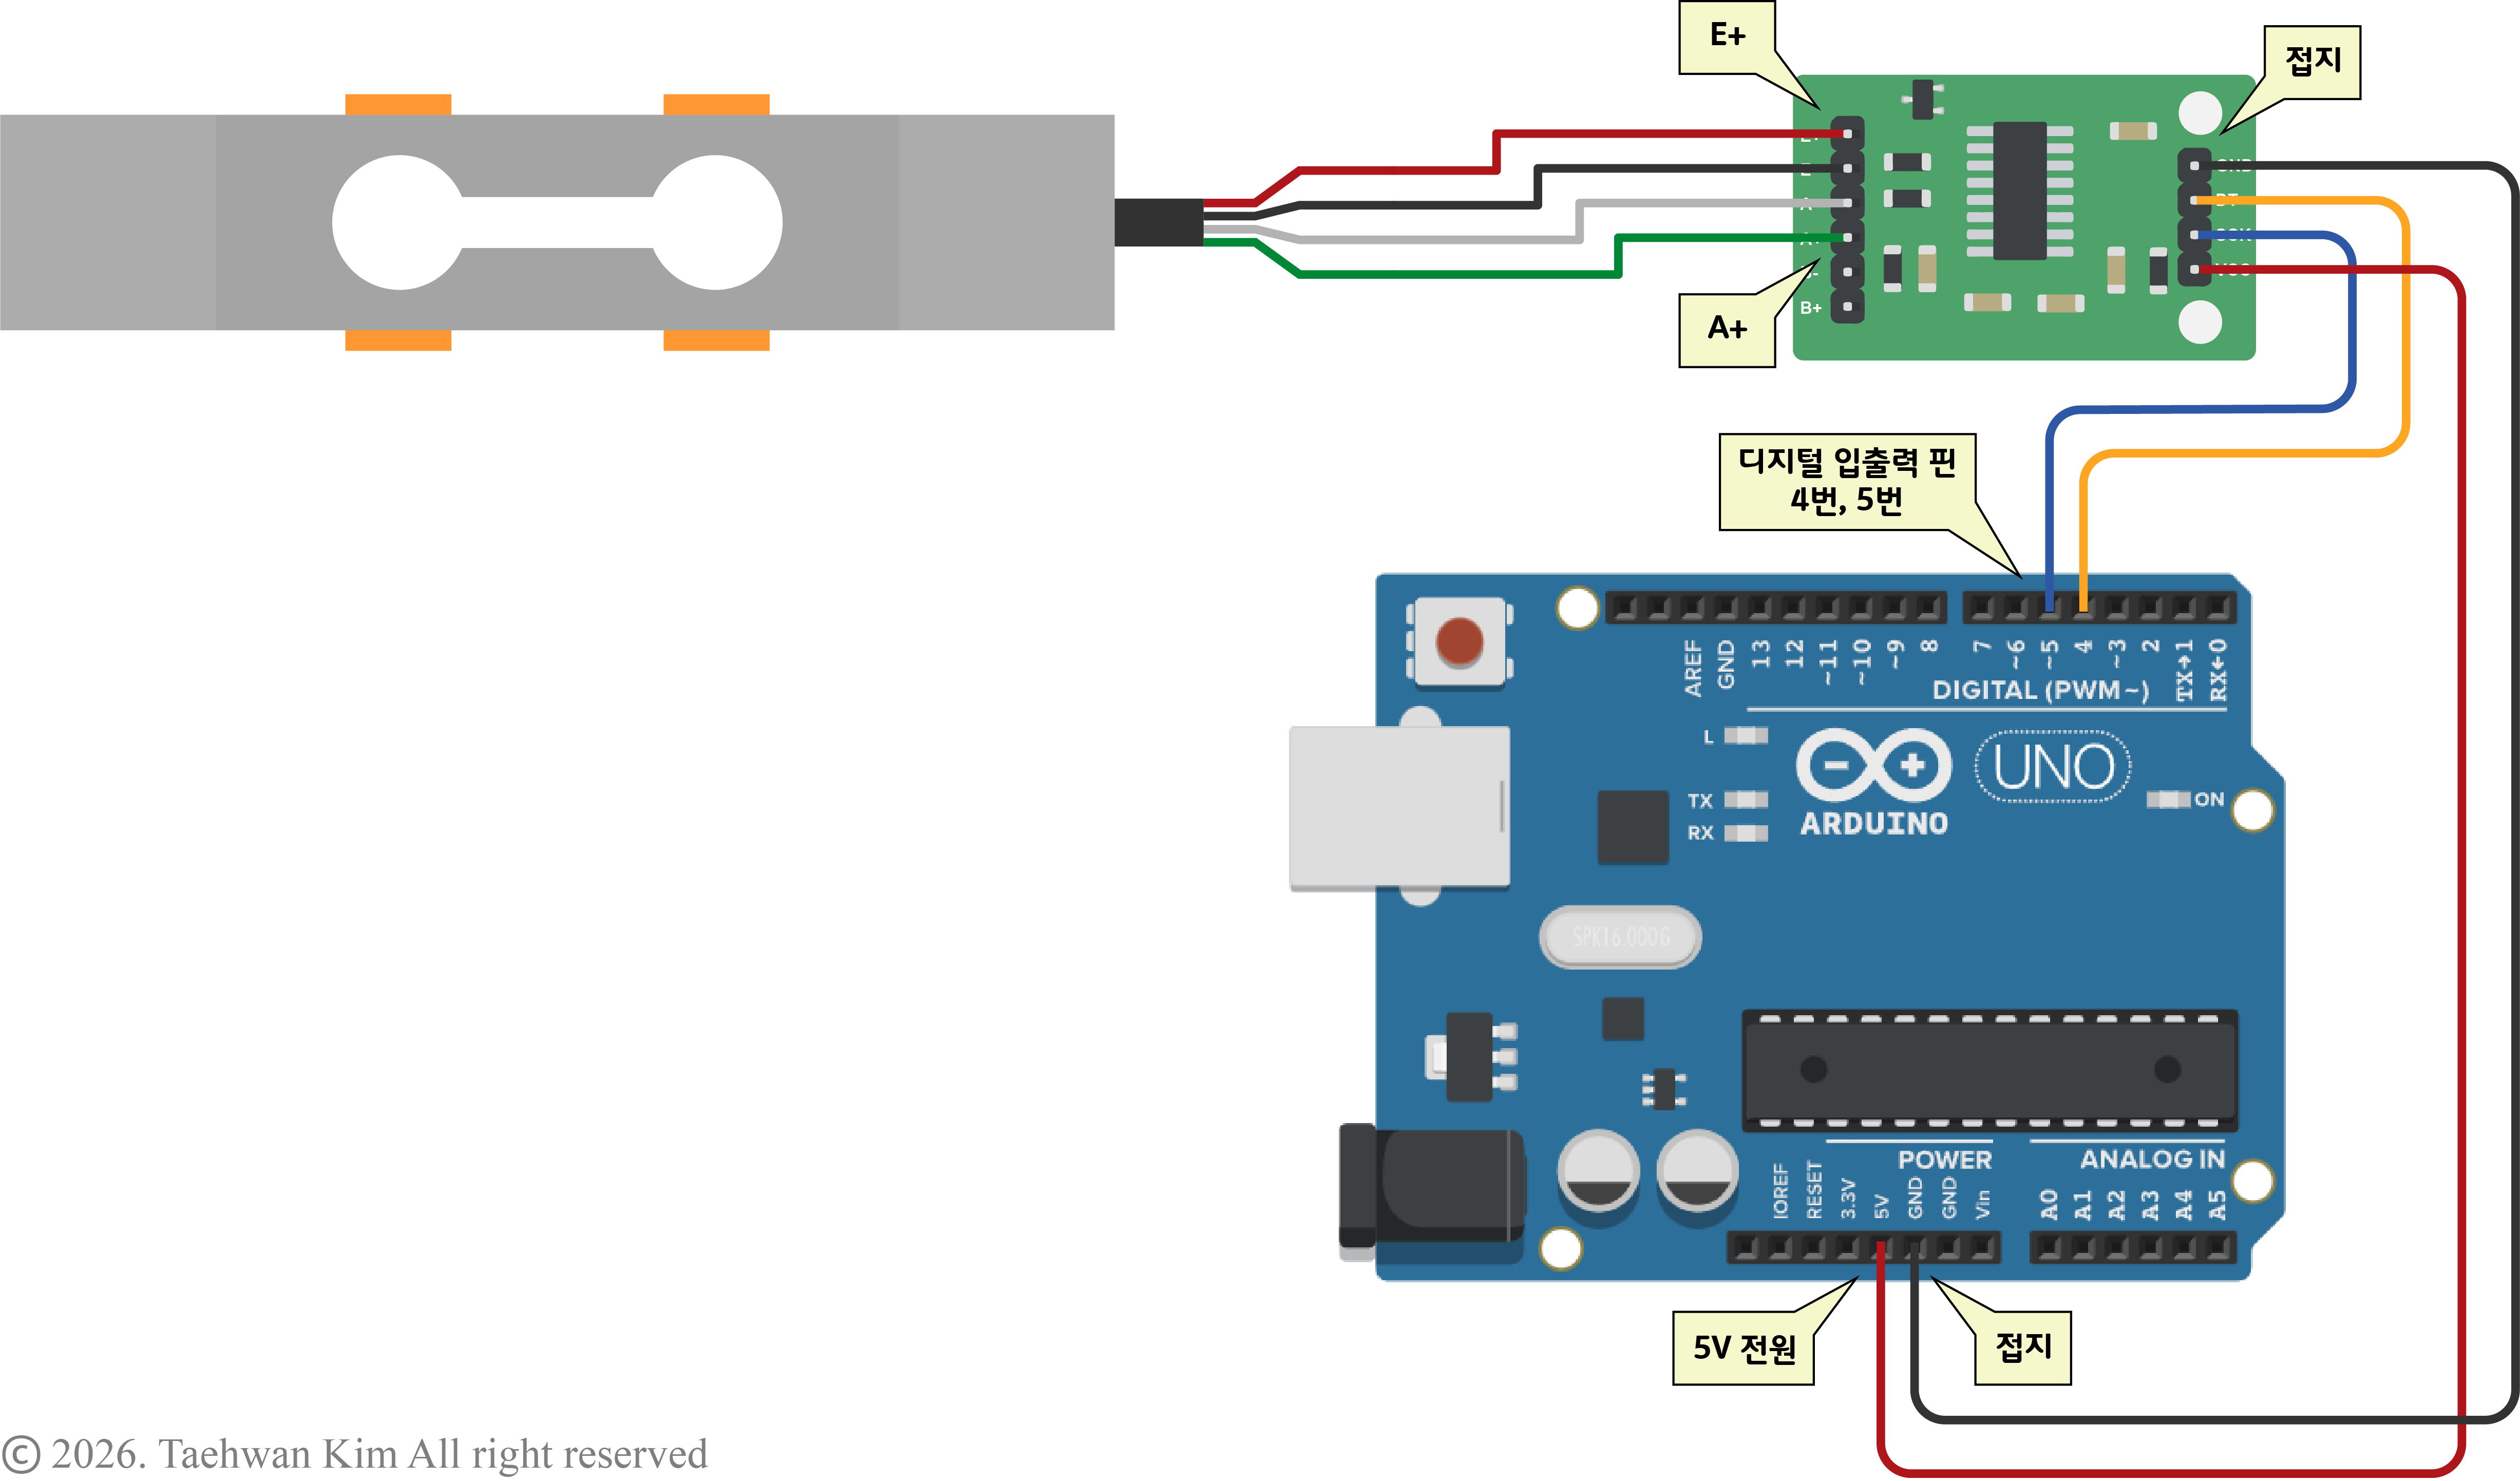
회로 구성 6.2. 프로그램 작성 - 로드셀 캘리브레이션
#include <HX711_ADC.h> // HX711 라이브러리 추가

// LoadCell이라는 이름의 HX711 객체 생성
HX711_ADC LoadCell(4, 5); // DT, SCK

unsigned long t = 0;

void setup() {
  Serial.begin(57600); // 시리얼 통신 시작 (통신 속도: 57600 bps)
  delay(10); // 10 ms 대기
  Serial.println();
  Serial.println("Starting...");

  LoadCell.begin(); // HX711 모듈과 통신 시작

  // 출력값이 음수라면 아래 명령문 주석처리를 지우세요
  //LoadCell.setReverseOutput();

  unsigned long stabilizingtime = 2000; // 전원 인가 후 안정화 시간 설정
  boolean _tare = true; // 초기 센서값을 0으로 설정

  // 로드셀 초기화
  LoadCell.start(stabilizingtime, _tare);
  if (LoadCell.getTareTimeoutFlag() || LoadCell.getSignalTimeoutFlag()) {
    Serial.println("Timeout, check MCU>HX711 wiring and pin designations");
    while (1);
  }
  else {
    LoadCell.setCalFactor(1.0);
    Serial.println("Startup is complete");
  }
  while (!LoadCell.update());
  calibrate(); // 캘리브레이션 함수 실행
}

void loop() {
  static boolean newDataReady = 0;
  const int serialPrintInterval = 0; // 시리얼 모니터 출력 지연 시간 설정

  // 로드셀 상태 변화 여부 확인
  if (LoadCell.update()) newDataReady = true;

  // 로드셀 센서값 출력
  if (newDataReady) {
    if (millis() > t + serialPrintInterval) {
      float i = LoadCell.getData();
      Serial.print("Load_cell output val: ");
      Serial.println(i);
      newDataReady = 0;
      t = millis();
    }
  }

  // 시리얼 모니터로부터 명령어 송신
  if (Serial.available() > 0) {
    char inByte = Serial.read();
    if (inByte == 't') LoadCell.tareNoDelay(); // 't' 입력 시 센서값을 0으로 설정
    else if (inByte == 'r') calibrate(); // 'r' 입력 시 캘리브레이션 시작
    else if (inByte == 'c') changeSavedCalFactor(); // 'c' 입력 시 캘리브레이션 결과값 수동으로 수정
  }

  // 센서값이 0으로 설정되었는지 확인
  if (LoadCell.getTareStatus() == true) {
    Serial.println("Tare complete");
  }

}

// 캘리브레이션 함수
void calibrate() {
  Serial.println("***");
  Serial.println("Start calibration:");
  Serial.println("Place the load cell an a level stable surface.");
  Serial.println("Remove any load applied to the load cell.");
  Serial.println("Send 't' from serial monitor to set the tare offset.");

  boolean _resume = false;
  while (_resume == false) {
    LoadCell.update();
    if (Serial.available() > 0) {
      if (Serial.available() > 0) {
        char inByte = Serial.read();
        if (inByte == 't') LoadCell.tareNoDelay();
      }
    }
    if (LoadCell.getTareStatus() == true) {
      Serial.println("Tare complete");
      _resume = true;
    }
  }

  Serial.println("Now, place your known mass on the loadcell.");
  Serial.println("Then send the weight of this mass (i.e. 100.0) from serial monitor.");

  float known_mass = 0;
  _resume = false;
  while (_resume == false) {
    LoadCell.update();
    if (Serial.available() > 0) {
      known_mass = Serial.parseFloat();
      if (known_mass != 0) {
        Serial.print("Known mass is: ");
        Serial.println(known_mass);
        _resume = true;
      }
    }
  }

  LoadCell.refreshDataSet();
  float newCalibrationValue = LoadCell.getNewCalibration(known_mass);

  Serial.print("New calibration value has been set to: ");
  Serial.print(newCalibrationValue);
  Serial.println(", use this as calibration value (calFactor) in your project sketch.");
  Serial.println("End calibration");
  Serial.println("***");
  Serial.println("To re-calibrate, send 'r' from serial monitor.");
  Serial.println("For manual edit of the calibration value, send 'c' from serial monitor.");
  Serial.println("***");
}

void changeSavedCalFactor() {
  float oldCalibrationValue = LoadCell.getCalFactor();
  boolean _resume = false;
  Serial.println("***");
  Serial.print("Current value is: ");
  Serial.println(oldCalibrationValue);
  Serial.println("Now, send the new value from serial monitor, i.e. 696.0");
  float newCalibrationValue;
  while (_resume == false) {
    if (Serial.available() > 0) {
      newCalibrationValue = Serial.parseFloat();
      if (newCalibrationValue != 0) {
        Serial.print("New calibration value is: ");
        Serial.println(newCalibrationValue);
        LoadCell.setCalFactor(newCalibrationValue);
        _resume = true;
      }
    }
  }
  Serial.println("End change calibration value");
  Serial.println("***");
}
6.3. 프로그램 작성 - 로드셀 신호 증폭 모듈 HX711
#include <HX711_ADC.h> // HX711 라이브러리 추가

// LoadCell이라는 이름의 HX711 객체 생성
HX711_ADC LoadCell(4, 5); // DT, SCK

void setup() {
  Serial.begin(115200); // 시리얼 통신 시작 (통신 속도: 115200 bps)
  delay(10); // 10 ms 대기

  LoadCell.begin(); // HX711 모듈과 통신 시작

  // 출력값이 음수라면 아래 명령문 주석처리를 지우세요
  //LoadCell.setReverseOutput();

  // ★★★ 캘리브레이션 결과값을 아래 변수에 저장하세요. 아래 값은 예시입니다.
  float calibrationValue = -144.28;

  unsigned long stabilizingtime = 2000; // 전원 인가 후 안정화 시간 설정
  boolean _tare = true; // 초기 센서값을 0으로 설정

  // 로드셀 초기화
  LoadCell.start(stabilizingtime, _tare);
  if (LoadCell.getTareTimeoutFlag()) {
    Serial.println("Timeout, check MCU>HX711 wiring and pin designations");
    while (1);
  }
  else {
    LoadCell.setCalFactor(calibrationValue);
  }
}

void loop() {
  static boolean newDataReady = 0;
  // 로드셀 상태 변화 여부 확인
  if (LoadCell.update()) newDataReady = true;

  if (newDataReady) {
    float force_g = LoadCell.getData(); // 로드셀 센서값 송신 (단위: g)
    Serial.print(force_g, 4); // 시리얼 모니터에 출력
    Serial.println('g');
    newDataReady = 0;
  }
}
[함께 읽으면 좋은 페이지]
아두이노 I2C 통신 | LCD I2C 모듈 LiquidCrystal_I2C.h
1. 아두이노 1.1. 하드웨어 종류 1.2. 소프트웨어 사용 방법 1.3. 회로 기초 지식 2. 아두이노 시리얼 통신(1): UART 2.1. 출력 2.2. 입력 3. 디지털 신호 I/O 3.1. 디지털 출력 3.2. 디지털 입력 4. 아날로그 신
vedacube.tistory.com
참고문헌
- Indrek. (2020). HX711 with a Four Wire Load Cell and Arduino | Step by Step Guide. YouTube. https://www.youtube.com/watch?v=sxzoAGf1kOo. 2026.01.12.
- LAUMAS Innovation in Weighing. (2023). 1. 로드셀 설치, 용량, 지지판, 장착 표면, 싱글포인트 로드셀. YouTube. https://www.youtube.com/watch?v=Qkd-dgOkoZA. 2026.01.12.
- Liz Clark. (2024). Adafruit HX711 24-bit ADC. Adafruit. https://learn.adafruit.com/adafruit-hx711-24-bit-adc/overview. 2026.01.12.반응형'Technology > Arduino' 카테고리의 다른 글
아두이노 라이브러리 | I2C 멀티플렉서 TCA9548A 모듈 (0) 2024.11.27 아두이노 라이브러리 | 자기 엔코더 센서 AS5600 모듈 (2) 2024.11.26 아두이노 | BLDC모터 (0) 2024.11.25 아두이노 라이브러리 | 서보모터 정밀 제어 (0) 2024.11.24 아두이노 프로젝트 | 휴대용 냉각기 (0) 2024.11.23